


The Event Scheduler is a generalized resource allocation tool. This tool is useful for people who have a pool of resources (which could be people or equipment) and need to determine how to allocate these resources to "slots" that require filling on particular dates (or events). For example, our worship team has several musicians with various skills. The worship leader needed to figure out which people should play for each service throughout the year. He used to do it manually, but it got to be a pretty difficult task as the number of team members grew. The desire to automate this allocation task was the impetus behind the development of this tool.
The Event Scheduler automates the task of determining which resources should be used to fill the required slots - thus saving lots of time. The application constructs a resultant schedule that tries to ensure that no one resource is overused while also honoring constraints and preferences.
The Event Scheduler is currently entering the post beta stages. The current release (2.0) provides an intuitive interface that allows for quick construction of scheduler projects. The Event Scheduler currently uses a greedy heuristic to figure out the best allocation of resources to slots. This is a simple approach to the problem, but it does produce good results. However, the results are not necessarily optimal and there are cases in which it fails to discover the "best" solution. In the future, I plan to extend the application by adding more intelligent algorithms that utilize linear programming and genetic algorithms. The more intelligent algorithms will allow the scheduler to produce much more desireable results
The screens below provide an overview of the Event Scheduler user interface.
| Main Screen |
|
|
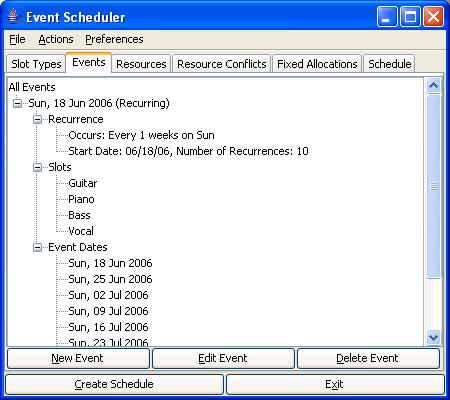
| Events Tree View |
|
|
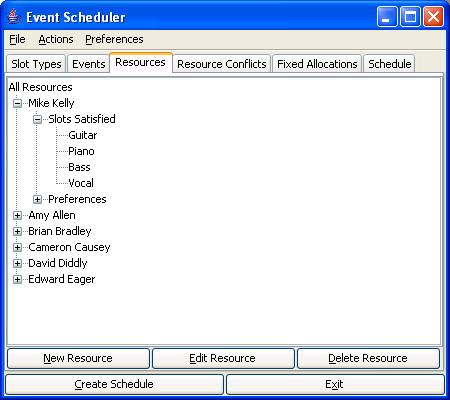
| Resource Tree View |
|
|
| Resource Conflicts Tree View |
|
|
| Fixed Allocation Tree View |
|
|
| Computed Schedule View |
|
|
Here's an example that should provide a decent introduction to the capabilities of the event scheduler application.
In this example we're trying to solve the following problem:
There are several musicians on the church worship team. Each musician has a variety of skills on various instruments. For instance, Mike can play guitar as well as bass. In addition to this, each musician has varying levels of proficiency with regard to each instrument played. For instance, Mike plays guitar and bass, but he plays guitar very well and bass only so-so. Every week, the worship leader must put together a collection of musicians that can fill the specified instrument slots. For example, every other Sunday, we want to have a worship band made up of guitar, vocal, bass, and piano. The problem here is how to assign resources to each of these slots. Looks pretty easy eh? Not exactly. What happens when people go on vacation or have other engagments that prevent them from playing? We need to be able to specify conflicts for the resources. For example, Mike is unable to play on 6/18/2006 and 7/2/2006. On top of this, we want to make sure everyone gets equal opportunities to play. Not only that, but we'd like to let the musicians play the instruments that they are most proficient on.
Launch the application by double clicking on the executable EventScheduler.jar file or by executing
java -jar EventScheduler.jar|
|
The event scheduler allocates resources to slots that are defined within events. In our case, the "slot types"
refer to the instrument slots that need to be filled by musicians on the worship team. You can define a slot type by
right clicking on the whitespace area under the "Slot Types" tab and selecting the "Add" option. You can also add slot
types by clicking the "New Slot Type" button or by pressing Alt+n. Let's define slot types for Guitar, Bass, Piano,
and Vocal.
|
|
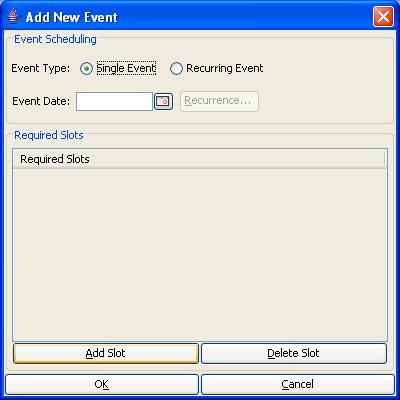
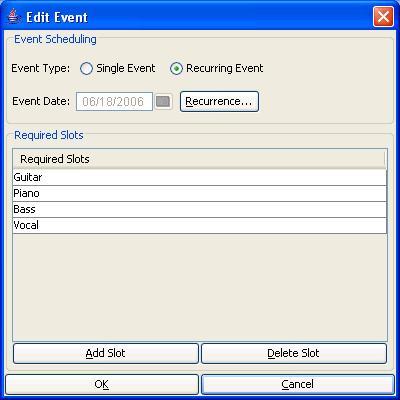
The next step is to define events that require slots to be filled. Select the "Events" tab and then select "Add" from the right click menu. A dialog appears that allows you to define single or recurring events.
|
|

|
|
|
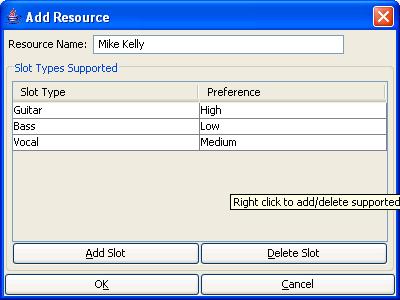
Now we need to define our resource pool that the application can use to fill slots. As mentioned earlier, many musicians are able to play multiple instruments. However, they can typically play one instrument better than others. Let's define a few resources. Let's start with me first. Select the "Resources" tab and then create a new resource by right clicking and selecting "Add". The resource dialog appears. Enter a name for the resource. I enter "Mike Kelly". Next enter the slot types that are supported by this resource in the "Slot Types Supported" area.
|
|
|
| Name | Slots Supported |
| Amy Allen |
|
| Brian Bradley |
|
| Cameron Causey |
|
| David Diddly |
|
| Edward Eager |
|
We're about ready to go into the summer months and everyone has vacation plans. Too bad they're all on different weeks. We still need to make sure all of the slots are covered, but we can't expect people to be in two places at once. How to solve this problem? Easy - just click on the "Resource Conflicts" tab and define date conflicts for each resource. Let's start with me. I know that I'm going to be out next week and three weeks from now. Create a new conflict by right clicking in the area under the "Resource Conflicts" tab and selecting Add->Date Conflict. The date conflict window appears. I select "Mike Kelly" from the drop down list and then select the dates that I will be out (6/18/2006 and 7/2/2006).

|
|
|
| Name | Conflict Dates |
| Amy Allen |
|
| Brian Bradley |
|
| Cameron Causey |
|
| David Diddly |
|
| Edward Eager |
|
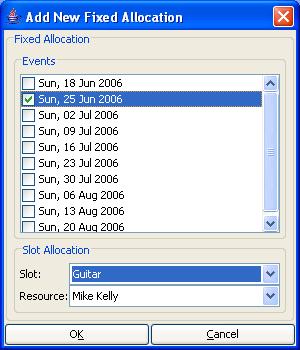
Now that we've defined slot types, events, resources, and resource conflicts - we're almost ready to run the scheduler algorithm. However, there is one more optional step - Fixed Allocations. We can define "fixed" allocations that basically tell the scheduler "thou shalt use this particular resource for this slot on this date". This can be useful when you have a couple of slots that you really want certain resources to fill. For our example, we'll keep it simple and just define one fixed allocation. Right click on the "Fixed Allocations" tab and then right click and select "Add". The fixed allocation window appears. Select "Sun, 25 Jun 2006" from the list of event dates. Then select "Guitar" from the slot dropdown list. Finally, select "Mike Kelly" from the resource dropdown list.
|
|
|
Now that we've defined all of the problem constraints, we can launch the scheduler. To do this, just click the "Create Scheduler" button. The scheduler runs and places the results under the "Schedule" tab. Click on the "Schedule" tab to see the allocations made. Note that the fixed allocation is preserved. Also note that the date conflicts are also honored. Pretty nifty eh? On the schedule tab, there is a place to enter a title for this schedule. For this example, let's enter Worship Team Schedule (6/18/2006 - 8/20/2006)
|
|
At this point, you might realize that some of the allocations aren't really what you wanted. No problem, just double click on a cell inside the schedule table. A list of potential resources appears (only resources whose date conflicts are not violated) appear. To create a fixed allocation, select a resource from the list, otherwise, hit "Esc" a few times to hide the drop down list. After making the refinements, you can select "Create Schedule" again to re-run the algorithm. Note that you might go through this process a few times before you like the results.

|
OK, we've created a schedule that we're somewhat happy with - now what? Let's save off the generated schedule first. Select "File->Export->Schedule Data". You can now export your generated schedule in one of three formats (html, xml, csv).
Now, let's save off the scheduler data (resources, slots, etc) so that we don't have to enter them in again next time. There's a few options for doing this: you can export particular pieces of the scheduler data or just save all of it into one file. It doesn't really matter since you can easily import data from scheduler files. Let's just save all of the data into one file. Select "File->Save". This opens the save window. I'll save the file as MySchedule.xml.
Now that the file is saved, we can always import ("File->Import") any Slots, Events, Resources, etc. into our next scheduler project.
You now have enough knowledge to create your own schedules using the event scheduler. The example provided above shows how the application can be used in the domain of creating worship team schedules. However, it is easy to see how the application could be used to create shift schedules or to allocate meetings to conference rooms.